
Note: Publications are not available in all accounts. To access this advanced feature, please contact your Account Manager.
To distribute new content via a publication, you will need to create and publish an issue. Before proceeding, keep in mind:
- The base campaign must be finalised and sent to at least one recipient before creating the issue.
- An issue must be created and published in a single session; it cannot be saved to be completed later.
- As soon as an issue has been published, it will be made available to all users, and they will receive a notification email. This cannot be undone.
To create and publish an issue:
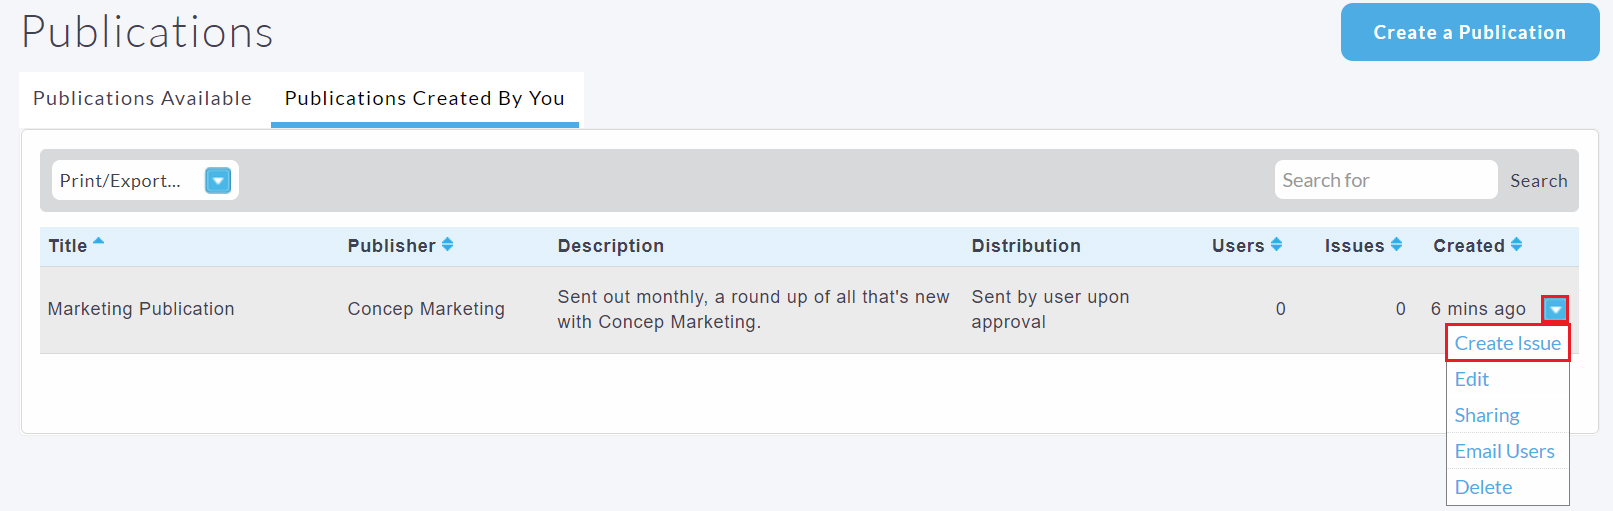
Click the Publications tab on the Home page.

Click the Publications Created by You tab.
Click the down arrow icon next to the publication title, and select Create Issue.
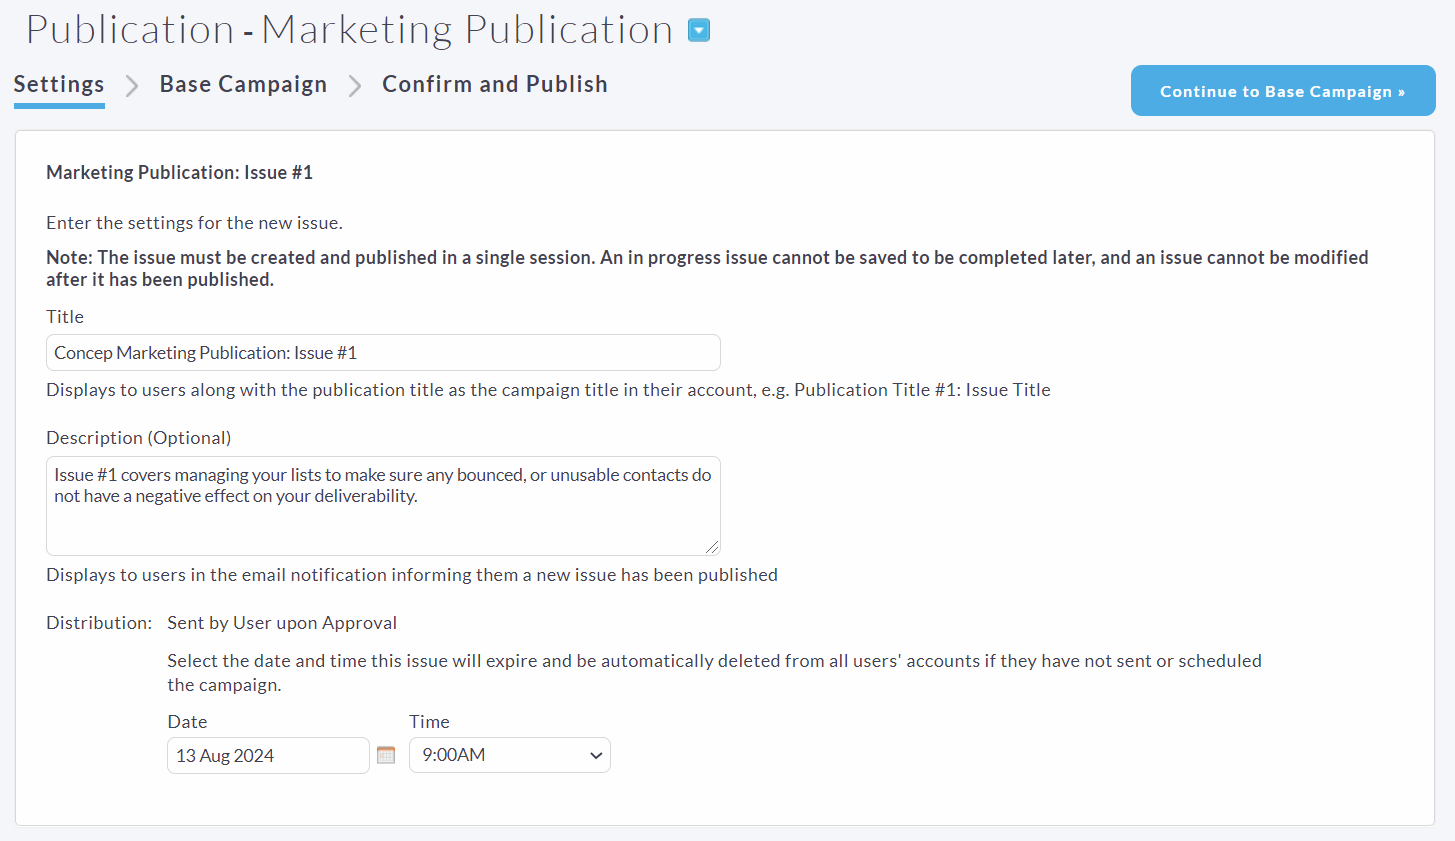
Step 1: Settings
- Enter a title for the issue. The title will display to users in the notification email as well as in their accounts as the campaign title along with the publication title: [Publication Title] #[Issue Number]: [Issue Title].
- Optionally enter a description for the issue that will display to users in the notification email.
- The options for distribution will be based on the distribution method for the publication:
- Sent Automatically – select the date and time the issue will be sent from users’ accounts
- Sent by User – select the date and time the issue will expire and be automatically deleted from all users’ accounts if they have not sent or scheduled the campaign
- Sent Immediately – no date or time options will display because the campaigns will be sent from users’ accounts immediately after the issue is published.
Click the Continue to Base Campaign button.
Step 2: Base Campaign
- Click the Select text link to choose the base campaign from your list of sent campaigns.
- Select the sent campaign from the list, and click the Select button.
- The base campaign will then be shown on the page. If you need to change the base campaign, click the Select text link again.
- All of the editable areas of the campaign will be outlined in blue when the page loads.
- Click on an area to make it editable for users in this issue. The area will change to a red dashed outline indicating it will be editable for all users.
- Click an area with a red dashed outline to return it to be non-editable for users in this issue.
- When all of the areas that should be editable by users in this issue are shown in red dashed outlines, click the Continue to Confirm and Publish button.
Step 3: Confirm and Publish
- Review the areas shown in red dashed outlines to confirm they are the areas that should be editable to users after the issue has been published.
- When you have confirmed everything is setup correctly, click the Publish Issue button.
- The campaigns will be distributed to users’ accounts based on the distribution method for the publication:
- Sent Automatically – a new campaign will be automatically placed in the In Progress tabs of any users that have enabled the publication. Users will be able to modify the areas outlined in red as well as the recipients for the campaign if needed, but they will not be able to copy the campaign. The campaigns will be automatically moved to the Scheduled tabs in the users’ accounts 30 minutes before the date selected in the Settings step and then sent at the designated time. Users can delete the campaign from the In Progress or Scheduled tab prior to the designated sending time if they do not want the issue to be sent to their contacts.
- Sent by User – a new campaign will be automatically placed in the In Progress tabs of any users that have enabled the publication. Users will be able to modify the areas outlined in red as well as the recipients for the campaign if needed, but they will not be able to copy the campaign. Users can send or schedule the campaign up until the expiration date selected in the Settings step. If they do not send or schedule the campaign before the expiration date, it will be automatically deleted from their account. Users can delete the campaign from the In Progress tab prior to the expiration date if they do not want the issue to be sent to their contacts.
- Sent Immediately – a new campaign will be automatically sent from users’ accounts as soon as the issue is published.
note: For the options send automatically and send by user, a restriction can be set for the time in between when an issue is created and when it can be sent. This time is controlled by the Minimum Issue Duration setting. By default this is set to 24 hours, meaning users would have to wait until the next day before they could send a created issue. This is done in order to promote the good practice of well prepared issues. This setting can be turned down if more flexibility is required.
Comments
0 comments
Please sign in to leave a comment.