How To - Create a registration form for your event
Description
Concep Send for Microsoft Dynamics CRM solution was designed to make your event registration management much easier. With our product you can create a web based registration form and have your event registration automatically created in your CRM.
Prerequisites
- An Email Marketing Sender security role assigned to your Microsoft Dynamics CRM user.
- At least one Send Account assigned to your Microsoft Dynamics CRM user.
- A campaign created for your event.
Steps
1. To create your event registration form you will need to access the ‘Surveys’ page, which is under the Concep section in the Marketing area.


2. Once on the survey page, click on ’Create Survey’.

3. A pop up box will load. Add your survey title and click on ’Create Survey’.

Important:
- The ‘Survey Title’ will be the name of the registration form in your CRM, therefore we recommend that clients use names that can be easily identified by other users.
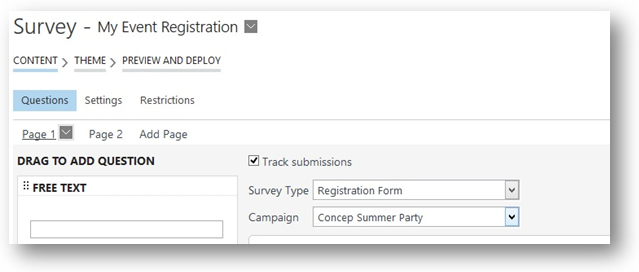
4. The page will refresh and the survey editing page will load. The first step is to enable the submissions tracking. This means that all responses will be loaded into your CRM.

5. When ’Track submissions’ is enabled, two new dropdown fields will load; ‘Survey Type’ and ‘Campaign’. In the “Survey Type” field, select ’Registration Form‘ and in the ‘Campaign‘ field, select the campaign you have created for your event.
Important:
- The ’Survey Type” field is populated with data from your Microsoft Dynamics CRM. Therefore, this can be edited to change the options label or add new survey types.
- You will only see the campaigns you have permission to see. If another user has created a campaign for your event, please ensure that the user has shared this campaign with you. This will enable you and your users to have access to the campaign.
6. The next step is to create the questions to capture your invitee information. You can either drag the questions from the menu on the left hand side, or click on the ’Add Question‘ button.
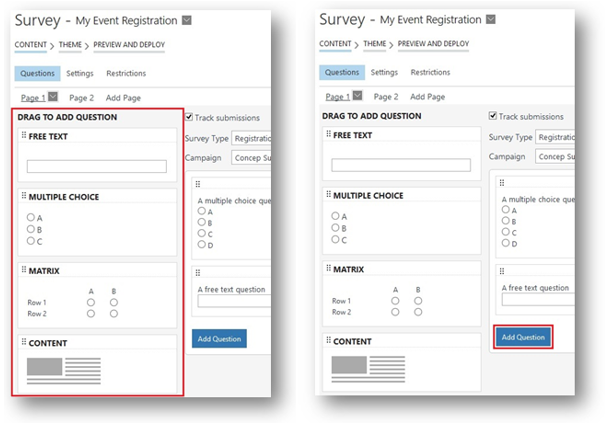
7. If you have opted for clicking on the ’Add Question‘ button, you can now select the type of question you wish to create.

8. Write your question text in the ’Question Content‘ box, select the contact or campaign response you wish to map your question to and click on the ’Update‘ button. Repeat these steps for all questions.
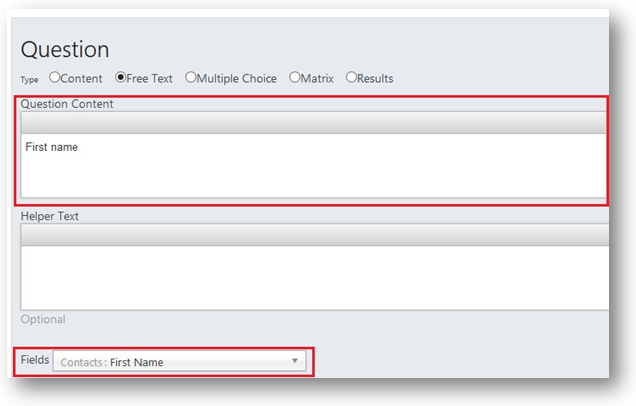
* Don’t know what the mapping is for? Click here for more information.
9. Once you have finished creating the questions to capture your invitee information, you have to create your event confirmation question. You will need to create a ‘Multiple Choice’ question and write the question text as described in the steps above. then, you need to map your question to the ’Response Code‘ field.
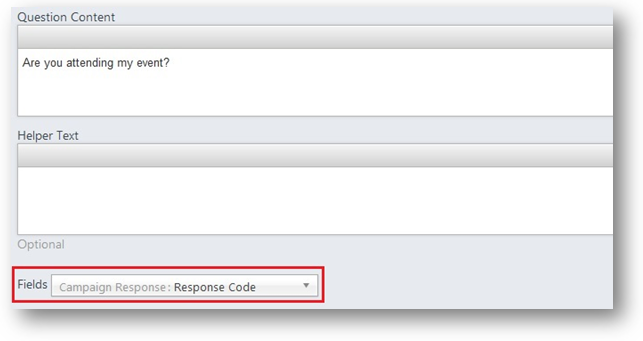
10. Once your Response Code is mapped, it is time to select the codes you wish to be logged for your respondents’ answers. Write the options for your survey answers fields and then map the survey answers you have created to one of the existing options available for the ’Response Code‘ field. Whichever option you select will be the code of the Campaign Response created in your CRM for each respondent of your registration form. Don’t forget to click on ’Update‘ once you have finished editing the question.

Important:
- The Response Code options can be edited by your CRM Admin in your Microsoft Dynamics CRM. You can have as many options as you wish and can rename any existing options.
- By default, only the response codes Invited, Attending and Not Attending will be compatible with the Concep report view in CRM. If you would like to use other response codes for the Concep report, please speak to your CRM Admin.
11. Click on the ’Save and Continue to Theme‘ button to move to the Theme section. In this section, you can edit your registration form layout by selecting one of the existing themes, or by creating your own. When you are finished, click on ’Save and Continue to Deploy‘.
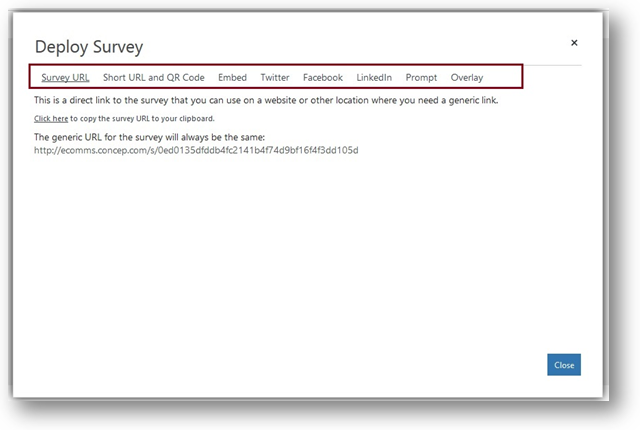
12. Once in the ‘Deploy’ section, click on the ’Deploy Survey‘ button. A pop up box will load, in which you will find 8 different options to deploy your survey. Use the option(s) which are the most suitable for your event promotion.
If you wish to invite your contacts or leads to your event, use the ‘Email Campaign’ feature to create and send an email campaign to your target. Your invitees’ responses will be loaded as both campaign responses and survey responses, which can be found in the contact dashboard.
Comments
0 comments
Article is closed for comments.