What is an Autoresponder and how does it work?
Autoresponders are the tool, content automation is the result. With Concep Send, you can set up Autoresponders to send out campaigns dependent on two types: Groups and Campaigns. Once setup, the autoresponder will send out at the same time each day. You're also able to setup nurturing emails to go out after days, weeks or months of the first campaign, leaving you to focus on other tasks.
There are two types of Autoresponders:
Campaigns: The autoresponder will send a series or sequence of emails to recipients based on when they receives a certain source campaign. For example, set up event workflows based off a chosen event campaign.
Groups: You can setup one or a series of campaigns to be sent based on when a contact is added to a specific group. Currently this can be setup in conjunction with Survey Actions recording RSVPs to events or in conjunction with our automated list sync. Please contact our Support team for more information.
How to setup an Autoresponder
To setup your workflow, navigate to Autoresponders from the main navigation menu under Marketing. If this option isn't available to you, please contact our Support team who will be able to assist you.
You'll need to name your Autoresponder, for example: Nurturing workflow, Work anniversary or Consent workflow.
Next you'll need to pick where you would like to source your recipients from, as per the types outlined above. Please note, the Autoresponder will not send out to any contacts until you have confirmed and activated and it will only send at the time you state.
Once you're happy, click Save and Continue to configure the Sequence.
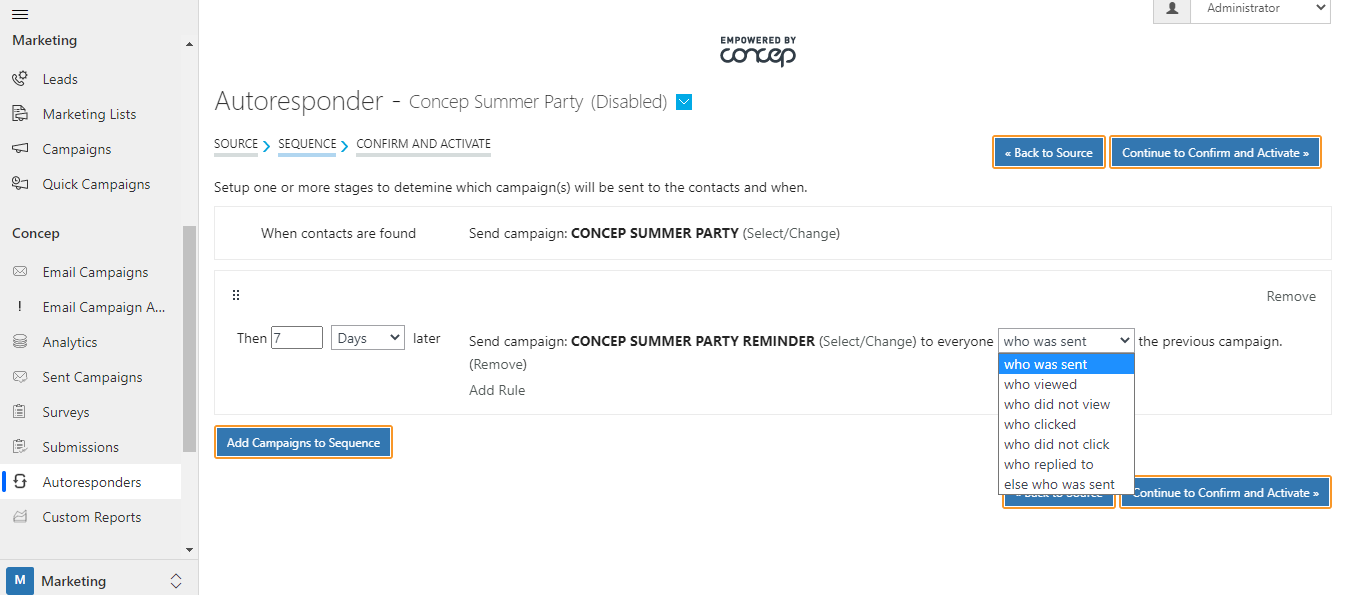
Now from the Sequence tab, you can either choose to continue and use it as a one time thing, or you can add in more campaigns to trigger x amount of days/weeks/months. Here in the example below, I have set up a follow up Campaign to be sent 7 days later to recipients who did not click the first campaign. Once your Sequence has been selected, click on Continue to Confirm and Activate.
Please note that you will only be able to select previously sent Campaigns, as in progress Campaigns will not show up in the Reports tab.
You will only be able to select a sent campaign because they cannot be changed or deleted, therefore the campaign (and by effect the autoresponders) will always stay in tact.

In this final section, you will be able to specify what time of day the Autoresponder will run. You will also be able to see a summary of how it has been configured. Once you are happy, click Activate which will change its status from Disabled to Active. You will also see a Success icon appear confirming that this Autoresponder has been set up and is now live.
If you no longer want the Autoresponder to run, you can navigate to the section, click on the drop down arrow next to the title and select Disable.

Why should you use Autoresponders and how do you get the most out of them?
- It eliminates the need to send manual follow ups to Contact groups reducing the amount work for the User meaning it is a huge time saver.
- It can be used for a sequence of marketing emails, Onboarding/New starter comms and GDPR communications.
- Campaigns are simply sent out without further interference which will reduce human error, as runs in the background.
- They are versatile, in the way that you can choose from two different types and customise the sequences.
- Low impact on marketing, leads to great relationship nurturing.
Frequently Asked Questions (FAQ)
Can I change my Autoresponder after it has been set up?
Yes, you can edit them by going to the Autoresponder section, clicking the drop down menu then selecting Edit.
What happens if I disable my Autoresponder and then enable it again?
Autoresponders that are pre scheduled will still be sent out but any Contacts that have been added after the Autoresponder has been Disabled will not receive communications. Once the Autoresponder has been Activated again, all contacts associated with that Autoresponder will receive communications.
Comments
0 comments
Please sign in to leave a comment.