
To get to your preference manager, go to Settings > Preference Center > Copy
Any edits that you make to the Copy will automatically convert over once you refresh the Preference Center browser
Using these settings it is possible to configure the following Preference Center options to brand or to inform the recipients about the preference centre.
Some of the areas include the ability to merge text into the page such as your email address. If you wish you can insert the following merge text where possible:
- First Name
- Last Name
- Sender Name
- Sender Email
Page Title: Changes the title for the Preference Centre.
Page Header: Changes the text that appears at the very top of your preference centre.
Page Footer: Changes the text that appears at the very bottom of your preference centre.
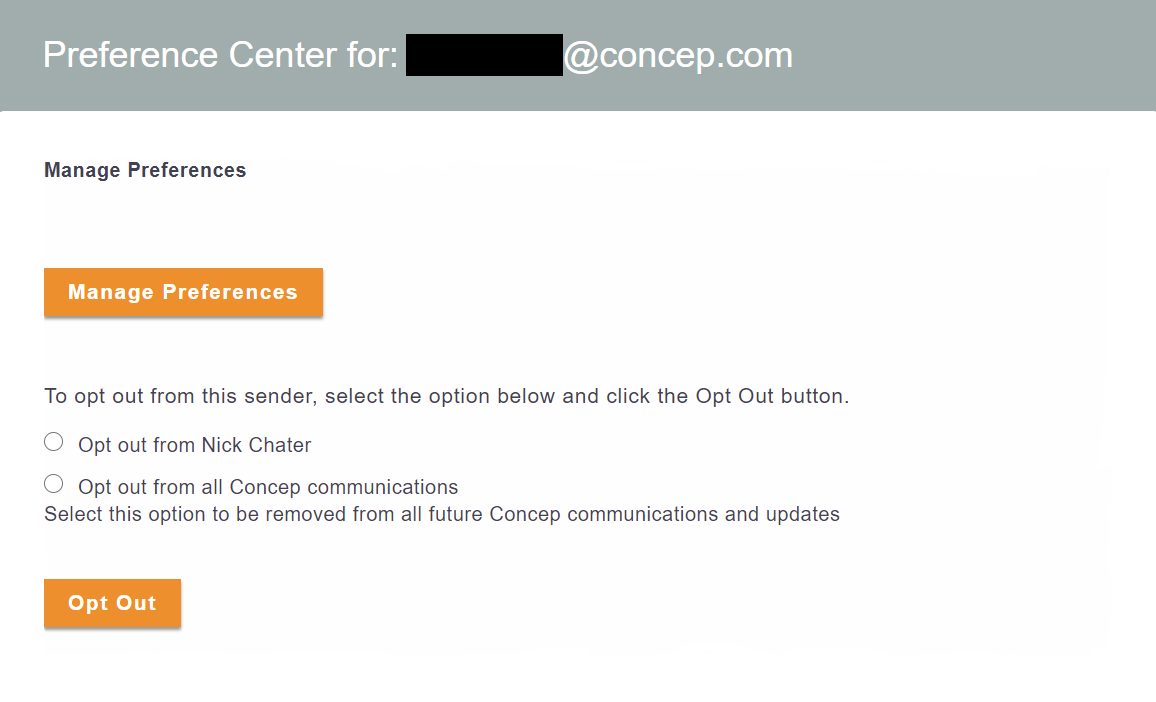
Page Heading: Changes the page heading shown here starting "Preference centre for:..." The email address of the account is shown to the right.
Manage Preferences Heading: Changes the text that appears at the top of the opt out page
Manage Preferences Instructions: Changes the text that instructs you on how to manage your preferences
Manage Preferences Button: Changes the text in the 'Manage Preferences' button
Opt out Heading: Changes the text shown starting "Opt out" as above.
Opt out Instructions: Changes the text that instructs you on how to opt out
Opt out Processed: Changes the text on the processed screen when you successfully opt out
Opt out Undone: Changes the text that appears when a contact cancels and opt out via clicking an opt in link or confirmation email
Opt out Undone Error: Changes the error message that appears when a contact is unable to be opted back in
Opted out Already: Changes the text that appears when an already opted out contacts tries to opt out again
Opt out Button: The text displayed inside the button for "Opting out" as shown in the image above.
Opt out Error: If no level of opt out is selected an error is shown. Using this setting you can configure the error message.
Opt out Reason heading: Changes the text that appears on the opt out screen asking why the contact is opting out
Opt out Reason Instructions: Changes the text that appears to guide the contact into clicking one of the opt out options below
Opt out Reason Button: The text displayed inside the button for the opting out reason
Opt out Reason Options: Changes the text that will appear with the various options of why a contact is opting out
Opt out Reason Processed: Changes the thank you message that appears once a contact has successfully opted out
Prevent opt outs from internal/corporate staff message: Changes the text that will appear when a internal or corporate member of staff who hasn't be authorized to opt out attempts to.
Sign up Button: The text that appears in the sign up button
New sign up submitted heading: Changes the text that prompts the contact to enter their email
New sign up submitted text: Changes the text that appears to tell the contact to click the link in the confirmation email to complete a sign up
Update Button: The text within the update button
Update Submitted Heading: Changes the text that appears in the submitted heading i.e 'Confirm your Details'
Update Submitted Text: Changes the text that appears after an update has been submitted
Comments
0 comments
Article is closed for comments.